· Nordic · 7 min read
Debugging nRF52 projects with NRF_LOG module
Debugging embedded systems can be tricky — but Nordic’s NRF_LOG module makes it much easier when working with nRF52 projects. This article walks you through how to use the NRF_LOG module to output real-time debug messages over UART or RTT, helping you monitor your application’s behavior as it runs. We’ll cover its key dependencies, how to configure the backend, enable logging levels, and integrate it smoothly into your nRF5 SDK project. Whether you're chasing bugs or just want better visibility into your system, NRF_LOG is an essential tool in your debugging toolkit.
Introduction
As a developer, you know that it is next to impossible to write perfect code at the first attempt, except for really simple programs. When writing your nRF52 applications, you would normally need to know where your current code execution is. There are different techniques to help you achieve that and debug your code, of which a common method is to print out log messages to console to inspect code execution. Nordic provides a flexible logging module called NRF_LOG for that purpose. NRF_LOG module can use different backends, such as RTT (Segger Real Time Transfer) or UART to print out messages. It can also be configured to compiled or not so that you can easily switch between development mode and release mode by just adjusting a configuration. In this article, we will examine the module’s dependencies, how to set it up and use it to print out log messages and different options for controlling the module’s behaviour.
To compile and run your code on real nRF52 hardware, it is recommended that you have a nRF52 development kit such as
Affiliate Disclosure: When you click on links in this section and make a purchase, this may result in this site earning a commission at no extra cost to you.
NRF_LOG module with UART backend
First, we will examine how to use UART as backend for NRF_LOG module. Use UART backend means the log messages will be flushed using UART module and you will need an UART terminal on your computer to see the messages.
Dependencies
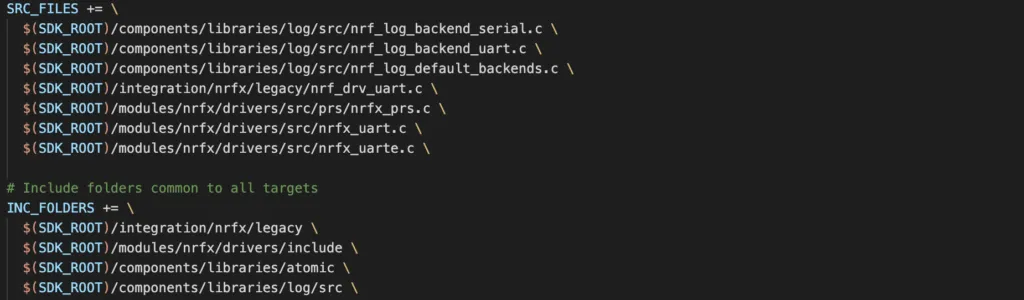
The NRF_LOG module requires to include several dependencies. To use NRF_LOG with UART backend, you need to add the following source and header files in the source file list and include folders:
Enabling the module
Open your project configuration sdk_config.h. Follow instructions in our previous post about enabling UART module in project configuration so that the NRF_LOG module can call UART driver functions. You then need to add the below definitions.
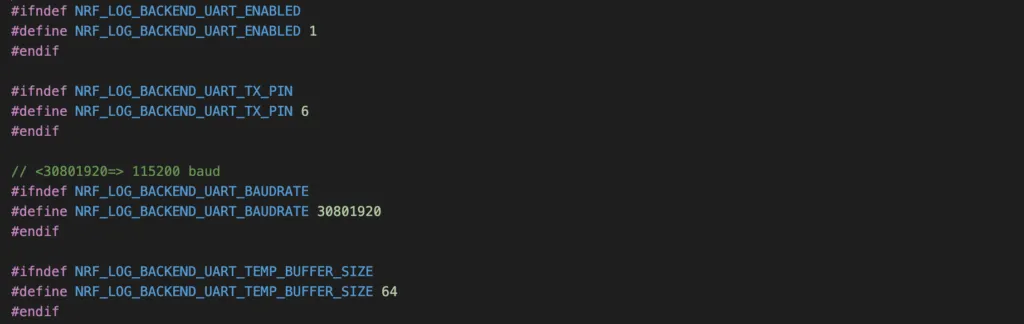
As you can see, you need to specify the TX pin which in our case, we are using PCA10040 development board, hence TX_PIN is pin 6. You also need to tell at what baud rate the module should communicate via UART, in this case the baud rate is set to 115200 baud. The buffer size parameter is a trade-off parameter. If you specify a large number, it will use more RAM resources. If you use a small buffer, some logs may be skipped.
Finally, add the following settings.
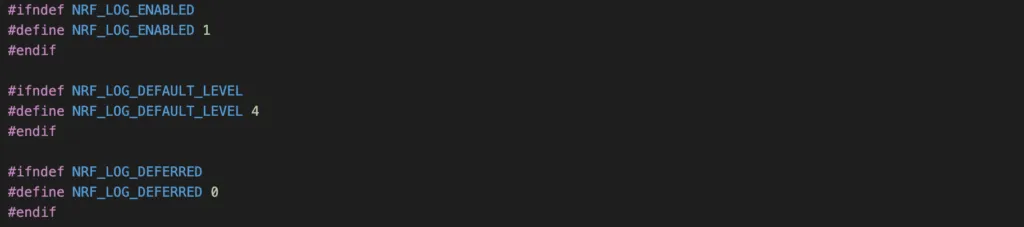
Here we are enabling the NRF_LOG module, set the default level to 4 and disable deferring log. There are 4 log levels: error, warning, info and debug which correspond to numbers 1, 2, 3, 4. Setting log level to debug means all debug messages are compiled and printed to console. If you set it to level 3, error, warning and info messages are compiled and printed, but debug messages are ignored. They are not even compiled. This is quite convenient as you can switch between production and development code with a simple setting. In production, you usually don’t want to keep debug log to reduce the size of the firmware image. In development, you need debug log to understand where your current code execution is. Using this setting means you don’t need to comment out all debug log lines in your code when you release your firmware. The log deferred set to 0 means log will be processed and printed out immediately where the log macros are placed. In certain situations, this is undesirable as it might slow down critical code execution. Therefore, changing this parameter to 1 will put log processing to idle task where no other task is running. You will need to flush the log manually in this case.
Initialising
To initialise NRF_LOG module, you first need to include the following header files
#include "nrf_log.h"
#include "nrf_log_ctrl.h"
#include "nrf_log_default_backends.h"
Then use the following macros to initialise the module
APP_ERROR_CHECK(NRF_LOG_INIT(NULL));
NRF_LOG_DEFAULT_BACKENDS_INIT();
Using the NRF_LOG module
After initialisation, you will be able to use NRF_LOG module functionality, for example
NRF_LOG_INFO("Program started");
NRF_LOG_DEBUG("This is a debug line");
NRF_LOG_WARNING("This is a warning");
NRF_LOG_ERROR("This is an error");
View log messages on UART terminal
Once you added the module, you will be able to see log messages printed on a connected UART terminal. Connect your PCA10040 development kit to a computer using USB cable. Open a Terminal, then type
screen [PORT] 115200We are using screen program to view UART messages sent by the kit. [PORT] is the serial port, which you can check by ls /dev/cu* and 115200 is the baud rate of UART communication. If everything is working properly, you will see the following lines on the terminal:
<info> app: Program started
<debug> app: This is a debug line
<warning> app: This is a warning
<error> app: This is an error
NRF_LOG module using RTT backend
In this section, we look at what are required to add NRF_LOG module using SEGGER RTT backend. Similar to adding NRF_LOG using UART backend, you will need to add required source files and include folders, then enable the module in sdk_config.h.
Dependencies
Add the following source files and folder to Makefile so that NRF_LOG can call appropriate required functions when needed

Enabling the module
Add the following definitions to your project configuration sdk_config.h, there are quite a few of them and they are all used internally by NRF_LOG source files. You will get compilation error if one of these definitions is missing.
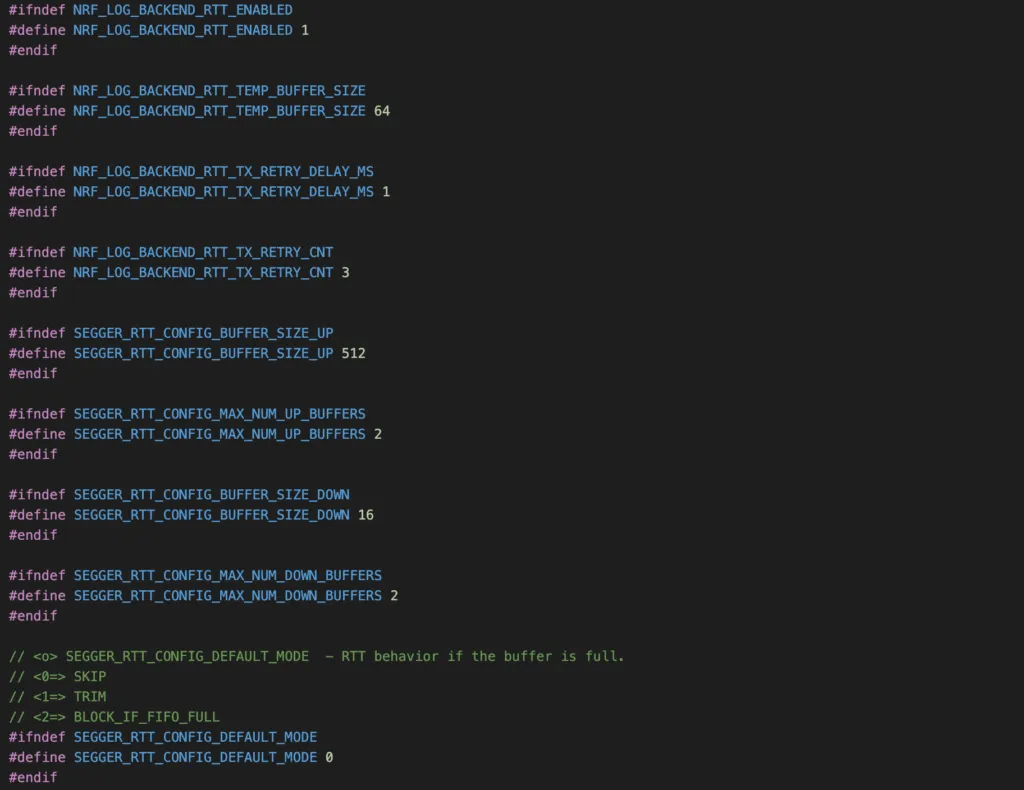
One setting worth to mention is SEGGER_RTT_CONFIG_DEFAULT_MODE. If you set it to 0, when the buffer is full, it will ignore some messages and you will see some missing texts in the console. Sometimes you don’t want this behaviour and need full texts instead. In this case, set this to 2 and it will block code execution if there is no room to store log. All logs will be printed out to console, but it might have undesirable consequences on your program.
Using the module with RTT backend
Now to see log messages printed on RTT Viewer, open two terminals. On the first terminal, type this command and hit Enter
JLinkExe -if SWD -device nrf52 -speed 4000 -autoconnect 1On the second terminal, type this command and hit Enter
JLinkRTTClientYou will see the same log messages above appear on the terminal.
Format log messages in NRF_LOG
In this section, we will look at different macros for formatting output messages during debugging process. Sometimes, you might want to print out texts, or you might need to inspect the value of a variable. How would you do that with NRF_LOG?
Print strings
To print text strings, you can use NRF_LOG_INFO, NRF_LOG_ERROR, NRF_LOG_DEBUG or NRF_LOG_WARNING, depending on the type of messages. The NRF_LOG_DEFAULT_LEVEL setting will determine which log messages are compiled and printed to the console. For example, if you set NRF_LOG_DEFAULT_LEVEL 4, all error, warning, info and debug messages are printed. If you set NRF_LOG_DEFAULT_LEVEL 3, only error, warning and info are printed, and debug logs will not be compiled and shown.
Print raw string without prefix or timestamp
You can use NRF_LOG_RAW_INFO macro log messages without prefix or adding a new line. For example
NRF_LOG_RAW_INFO("Log 1");
NRF_LOG_RAW_INFO("Log 2")
will output:
Log 1Log 2Print numbers
The NRF_LOG macros are printf-like function and can take up to seven argument. You can print an integer number and format as decimal or hex numbers, for example:
uint32_t x = 100;
NRF_LOG_DEBUG("x = %d (0x%x)", x, x);
The result log will be
<debug> app: x = 100 (0x64)Print float
To print float values, you need to use macros NRF_LOG_FLOAT_MARKER and NRF_LOG_FLOAT(value), for example:
double y = 1.23;
NRF_LOG_DEBUG("y = " NRF_LOG_FLOAT_MARKER, NRF_LOG_FLOAT(y));
The above code will produce output:
<debug> app: y = 1.23Print raw data
You can use NRF_LOG_HEXDUMP_ERROR, NRF_LOG_HEXDUMP_WARNING, NRF_LOG_HEXDUMP_INFO and NRF_LOG_HEXDUMP_DEBUG to print raw data bytes. For instance:
uint8_t bytes[5] = { 1, 2, 3, 4, 5 };
NRF_LOG_HEXDUMP_DEBUG(bytes, 5);
will print out this log message
<debug> app: 01 02 03 04 05 |.....Wrapping Up
NRF_LOG module is very useful during the development process in which you need to keep track of where the current execution is. It is used everywhere in nRF5 SDK. It is highly recommended that you learn how to use it as it will pay off your effort. Thanks for reading.