· Nordic · 5 min read
nRF52 freeRTOS blinky
Getting started with FreeRTOS on the nRF52 is easier than you might think! In this article, we’ll show you how to set up a basic FreeRTOS application on the nRF52 and create your first task — a simple "blinky" task to toggle an LED. You’ll learn how to configure FreeRTOS for the nRF52 platform, create tasks, and handle delays, all while taking advantage of the real-time features FreeRTOS offers. Whether you're new to FreeRTOS or embedded systems in general, this guide will help you build a foundation for more complex applications in no time.
Introduction
This article shows you how to get started with developing a freeRTOS application for Nordic nRF52. By going through a blinky project with freeRTOS on nRF52, you will learn:
- How to create a project with freeRTOS support in nRF5 SDK
- What are important files to work with in a nRF52 freeRTOS project
- How to create a freeRTOS task to blink an LED in nRF52
To compile and run your code on real nRF52 hardware, it is recommended that you have a nRF52 development kit such as
Affiliate Disclosure: When you click on links in this section and make a purchase, this may result in this site earning a commission at no extra cost to you.
Create a nRF52 freeRTOS project
In this section, you will learn how to create a nRF52 freeRTOS project without SoftDevice. The recommended way to create a new nRF52 project is to start from an example in the nRF5 SDK and modify it. It will reduce your chance of getting errors and speed up the development process.
We will start with the blinky_freertos example in the nRF5 SDK as shown below
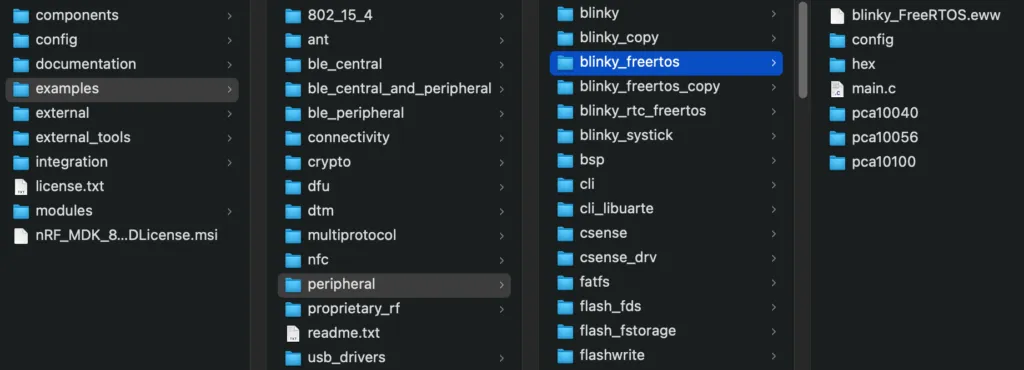
Since we are using GCC for our development, let’s have a quick look at the important files in the folders that we are interested in:
blinky_freertos
|---config
    |---FreeRTOSConfig.h
|---main.c
|---pca10040
    |---blank
        |---armgcc
            |---blinky_FreeRTOS_gcc_nrf52.ld
            |---Makefile
        |---config
            |---sdk_config.h
As shown in the above diagram, those are the files that we will be working with. Here is the explanation of the roles of each file:
FreeRTOSConfig.hcontains parameter definitions that are specific for freeRTOS such as total heap size, use idle hook, etc. By modifying the parameters in this file, you change the way freeRTOS operates.main.cis where your main application code goes.blinky_FreeRTOS_gcc_nrf52.ldis the linker script which specifies where should your code be located in different parts of the physical memory.Makefilecontains instructions where to look for source and header files, compilation flags, and instructions how to build and flash the project.sdk_config.his the configuration file storing nRF52-specific definitions. You can enable or disable certain peripherals or change their default configurations insdk_config.h.
If you have a close look at the Makefile, you can see that freeRTOS source files have been ported and included in the source file list:

To create a new project, duplicate the blinky_freertos folder and add your application code in main.c. If you rearrange the location of the above files, you will need to update the corresponding path variable in Makefile as well.
Create a freeRTOS task to blink a LED in nRF52
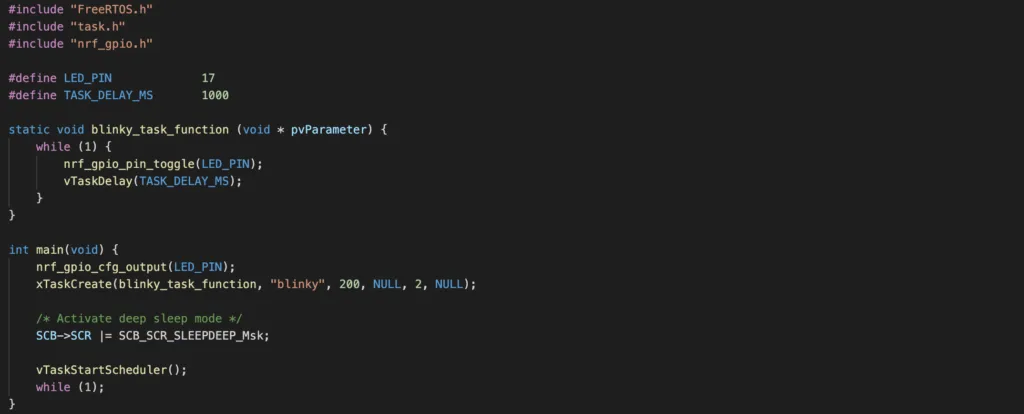
In a freeRTOS application, there can be many tasks. Each freeRTOS task is a small, independent program that has its own stack and a predefined priority. The freeRTOS scheduler determines which task to run based on the scheduling algorithm and task priority. To create a task, you use the freeRTOS API xTaskCreate(). In our project, we will create only one task which periodically toggle a LED pin and then goes to Blocked state. To add a delay in freeRTOS, we call the API vTaskDelay() which puts the calling task to Blocked state for a defined period. Now modify code in main.c as follow to create a task to blink a LED:
Code
How the code works
- To use freeRTOS task API, you will need to include
FreeRTOS.handtask.hheader files. - You also need to include
nrf_gpio.hheader file in order to use GPIO APIs as described in the previous post. - In our project, we are using PCA10040 development kit, which has a LED connected to GPIO Pin 17. We want to toggle this pin every second.
- In the main function, we configure
LED_PINas an output port usingnrf_gpio_cfg_output()function (if you forget, look at how to control nRF52 GPIO in the previous article) - We then use
xTaskCreate()function to create a freeRTOS task:- The task function
blinky_task_functionis the first argument. The task function implement an infinite loop which callsnrf_gpio_pin_toggle()to toggleLED_PIN, then callsvTaskDelay()to put the calling task to Blocked state forTASK_DELAY_MSmiliseconds. "blinky"is the name of this task. This name is to assist with debugging and not being used elsewhere.200is the stack size- We passed
NULLinpvParameterssince we don’t use any parameters 2is the task priority. The"blinky"task is assigned priority 2. This priority number is used by the freeRTOS scheduler to determine which task to run every tick period. A task with higher priority can pre-empt a task with lower priority. Since we only have 1 task in the project, this is not really matter.- We passed
NULLinTaskHandle_targument since we are not planning to refer to the created task anywhere else in the program.
- The task function
- After the task is created, we call
vTaskStartScheduler()function to start freeRTOS scheduler. At this point, the freeRTOS scheduler is running and the program should not reachwhile(1)line. Approximately every 1 ms (becauseconfigTICK_RATE_HZis set to1024inFreeRTOSConfig.h), the scheduler determines ifblinkytask should be running.
Build and flash the program
If this is the first time you work with Nordic nRF52, follow instructions in the previous tutorial for how to setup required tools to build and flash program on the target chip.
Run the following command to build and flash the program.
make flashYou should see that the LED 1 on the PCA10040 board blink every second after code is successfully flashed.
Wrapping up
In this tutorial, you have learnt how to get started with freeRTOS development on Nordic nRF52. This article is the foundation to continue building more complex nRF52 freeRTOS applications. See you in the next tutorials.
- freertos