· Nordic · 8 min read
Implementing a nRF52 DFU Bootloader over UART
Device Firmware Update (DFU) is a critical feature for maintaining and upgrading embedded devices in the field. In this article, you’ll learn how to implement a secure DFU bootloader on the Nordic nRF52 series using a UART (serial) connection. We'll guide you through setting up the bootloader using Nordic's nRF5 SDK, configuring the UART backend, and preparing your firmware for DFU packaging. With step-by-step instructions and a working test project, you’ll be able to update your device’s firmware securely and reliably — all over a simple serial link.
Introduction
In our previous article, you have learnt about general concepts of Device Firmware Update (DFU) with nRF52. To add DFU capability to your nRF52 product, you need to develop a bootloader. The bootloader’s role is to receive the new firmware image, validate and activate it. In this post, you will learn how to build and test a DFU bootloader over serial link (UART), meaning the new firmware image will be sent from a host computer to the target nRF52 chip by using UART module.
To compile and run your code on real nRF52 hardware, it is recommended that you have a nRF52 development kit such as
Affiliate Disclosure: When you click on links in this section and make a purchase, this may result in this site earning a commission at no extra cost to you.
- In this post, we will use PCA10040 development board
- Software:
- nRF5 SDK 17.1
- gcc-arm-none-eabi-9-2020-q2-update
- nRF Command Line Tools
- nrfutil version 6.1.3
Installing some software components are described in our previous post. Here I will start by describing how to install nrfutil which is not covered in the previous article.
Install nrfutil
nrfutil is the critical component when working with Nordic DFU as it is used to generate keys, update package and also used to transfer update package to the target chip via UART. Unfortunately, installing nrfutil might not be straight-forward for some systems. If you run into trouble when installing nrfutil, try googling your specific error. This is probably the most time-consuming step if something does not go well. In some cases, you might need to try installing from source code.
If you are using MacOS, nrfutil can be installed by opening a terminal and type
python3 -m pip install nrfutilIf you get an error like this

you will need to update pip first by running
python3 -m pip install --upgrade pipAfter upgrading pip, run the above command to install nrfutil again. After nrfutil is installed, you will see a warning message in the terminal saying the installed directory is not on PATH, which you will need to add. Depending on your shell terminal, you might need to modify .zprofile in order to add nrfutil to path variable.
Once installed correctly, you can check nrfutil by running
nrfutil versionGenerate keys using nrfutil
After nrfutil is installed, you will use it to generate public and private key pair to encrypt and validate the firmware image’s signature. To generate keys, type the following command in a terminal
nrfutil keys --helpYou will see instructions in the terminal about what are the parameters. To generate a private key, use the command
nrfutil keys generate private.pemTo generate the public key corresponding to the private key, use the following command
nrfutil keys display --key pk private.pem --format code --out_file dfu_public_key.cWe will need to use dfu_public_key.c in the next step.
Compile micro-ecc
We will use micro-ecc in our project to decrypt the new firmware image’s signature to verify if the firmware is coming from a trusted source. Open a terminal and go to micro-ecc folder in nRF5 SDK.
cd ~/nrf52projects/nRF5_SDK_17.1.0_ddde560/external/micro-eccRun the following command to remove unwanted character in build_all.sh
sed -i -e 's/\r$/' build_all.shThen run build_all.sh script.
./build_all.shThis will compile the library and add micro_ecc_lib_nrf52.a which is required in the next step.
Create a new bootloader project
In this step, you need to create a new project based on secure bootloader example in nRF5 SDK 17.1. Create a new folder at ~/nrf52projects/bl_uart_debug, then open the folder nRF5_SDK_17.1.0_ddde560/examples/dfu/secure_bootloader/, you will see the following files:
nRF5_SDK_17.1.0_ddde560/examples/dfu/secure_bootloader/
|---main.c
|---nrf_crypto_allocator.h
|---pca10040_uart_debug
    |---armgcc
        |---Makefile
        |---secure_bootloader_gcc_nrf52.ld
    |---config
        |---sdk_config.h
We will build a project based on the pca10040_uart_debug example. This is a project example for PCA10040 board. If you are using custom board, you can also use this example as a starting point and modify the UART TX and RX pin accordingly. _debug means this project is configured for printing out log messages using NRF_LOG module. Check out our previous article about NRF_LOG if you are unfamiliar with it. Since the NRF_LOG module is enabled, its size is larger than the non debug version pca10040_uart (104 kB vs 24 kB). You can see the difference in the linker scripts. The debug version has bootloader start address at 0x64000, while the non debug version uses bootloader start address at 0x78000. Our aim is to understand how the bootloader works, so we use the debug version. In production, you should use the non debug version and disable all logging feature to optimise the size of the bootloader.
Now do the following steps:
- Copy
main.c,nrf_crypto_allocator.h,Makefile,secure_bootloader_gcc_nrf52.ldandsdk_config.hto our project folder~/nrf52projects/bl_uart_debug. - Copy
dfu_public_key.candprivate.pemthat you generated previously to~/nrf52projects/bl_uart_debug/keys.
Open Makefile and make the following modifications
- Change
SDK_ROOTvariable to point to your installation folder of nRF5 SDK. - In the
SRC_FILESlist, change$(PROJ_DIR)/../dfu_public_key.c \to$(PROJ_DIR)/keys/dfu_public_key.c \ - Delete
../config \in theINC_FOLDERSlist.
Now run make to compile the bootloader project. You should see successful messages printed on the console.
Flash the bootloader
Up to this point, you have compiled the bootloader successfully. The next step would be flashing the bootloader to the PCA10040 board. You will need to open a terminal and type the following commands
make erase
make flash_mbr
make flash
These commands will perform 3 operations:
- Erase everything in the internal flash memory
- Flash the master boot record which is required when a bootloader is used and no softdevice is present.
- Flash the bootloader hex.
Testing the bootloader and DFU
Now your bootloader has been flashed successfully, we will test if the bootloader is able to perform the DFU functionality over UART. Because we are using the debug version of bootloader example, NRF_LOG module is enabled (see our previous post about enabling NRF_LOG module here) and you will see log messages printed on RTT client. Open two terminals and type the following commands
JLinkExe -if SWD -device nrf52 -speed 4000 -autoconnect 1
JLinkRTTClient
You will see the following log messages on RTT Client:
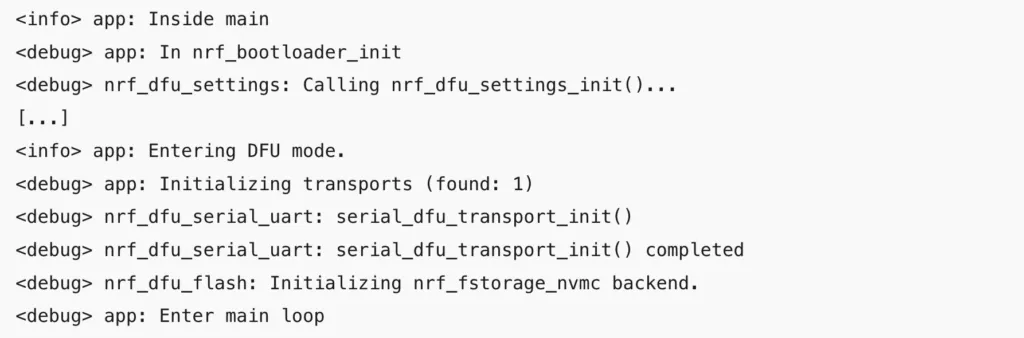
From these debug messages, you can infer how the bootloader works and you can trace back to each of the functions in the source code. For instance, you can see that on startup, it calls nrf_bootloader_init() and will check bootloader settings parameters to see if there is an application that needs to be activated, then check if there is a valid app to boot. If it detects no valid application, it will stay in bootloader mode waiting for a new application image.
In the next steps, we will:
- Use
nrfutilto generate a new firmware image to do DFU - Use
nrfutilto transfer the firmware package to target chip via UART
Generate a new firmware image
In order to test the bootloader, we need a new firmware image. We will generate a firmware image in zip format using nrfutil tool. We will use the blinky example in the nRF5 SDK examples nRF5_SDK_17.1.0_ddde560/examples/peripheral/blinky.
Open blinky_gcc_nrf52.ld and change the FLASH start address to 0x1000. Your memory map would look like this
MEMORY
{
  FLASH (rx) : ORIGIN = 0x1000, LENGTH = 0x80000
  RAM (rwx) :  ORIGIN = 0x20000000, LENGTH = 0x10000
}
The original hex file won’t work because the application start address is placed at 0x0. Since we are using a bootloader, we need a master boot record and it occupies the first 4 kB at the bottom of the flash address, as explained in our previous article. We need to move the application’s start address to above the MBR. If you are using a softdevice, the application will need to stay further up above the softdevice region.
Now compile the project by running make and copy nrf52832_xxaa.hex in the _build folder to ~/nrf52projects/bl_uart_debug/hex and rename it as blinky.hex. Our project folder will look like this
~/nrf52projects/bl_uart_debug
|---hex
    |---blinky.hex
|---keys
    |---dfu_public_key.c
    |---private.pem
|---main.c
|---Makefile
|---nrf_crypto_allocator.h
|---sdk_config.h
|---secure_bootloader_gcc_nrf52.ld
To generate a firmware update package using nrfutil, use the following command
nrfutil pkg generate --hw-version 52 --sd-req 0x00 --application ./hex/blinky.hex --application-version 1 --key-file ./keys/private.pem dfu_uart_package.zipdfu_uart_package.zip is the update package ready to send to the target nRF52 chip.
Transfer the update package over UART using nrfutil
To transfer the firmware package to the nRF52 chip, use the following command
nrfutil dfu serial -pkg dfu_uart_package.zip -p [PORT] -b 115200 -fc 1where [PORT] is the serial port and can be determined by ls /dev/tty*. If everything is working fine, you will see the message indicating the transfer is successful.
  [####################################]  100%
Device programmed.
This means the firmware has been transferred to the nRF52. Upon receiving this firmware package, the bootloader will do a couple of things:
- Verify the image by calculating the hash of the image using public key and compare it with the hash it receives in the init packet.
- If verification is successful, it will reboot the bootloader.
- Once the bootloader reboots, it will check if there is a pending application to be activated. It will activate the new application and boot it up.
- One the application boots up, you should see the LEDs blink sequentially as expected.
- To enter the DFU mode again to update new firmware, restart the board and hold the button 4.
Wrapping Up
Phew! That’s quite a bit of steps to follow to build and test DFU over UART. If you have come to here, conguratulations. You have successfully built a serial DFU bootloader based on the secure bootloader example in the nRF5 SDK. In the next article, we will learn about how to build a DFU bootloader over BLE link. Thanks for reading.