· Nordic · 10 min read
Developing nRF52 applications with GCC
The GNU Compiler Collection (GCC) is a popular choice for developing applications on the nRF52 family, offering flexibility and powerful optimization features for embedded systems. In this tutorial, we’ll guide you through the steps to set up your development environment for the nRF52 using GCC. You’ll learn about the essential components of a typical nRF52 GCC project, including directory structures, key configuration files, and toolchain setup. With a hands-on approach, we’ll walk you through creating, building, and flashing a simple nRF52 application, giving you a solid foundation for further development.
Introduction
There are several options when writing firmware for Nordic nRF52. You can use Segger Embedded Studio, which is an Eclipse-based integrated development environment. Other alternatives are Keil uVision, IAR, and GCC with Makefile. Each setup has its own advantages and drawbacks. In this post, I will show you how to setup a working environment for nRF52 family using GCC. This is my preference as it allows to understand what really happens behind the scene. When combined with a modern text editor such as Visual Code Studio, it can be a really good option and completely free. If you are already familiar with an IDE, however, I would not recommend to make a switch because the best option is the one you are used to. Here I will demonstrate the setup for MacOS systems, however, the same principle is still applied if you are using Windows or Linux machines. I will also explain the structure of a project built with GCC and what are most important files to work with.
Required tools
To compile and run your code on real nRF52 hardware, it is recommended that you have a nRF52 development kit such as
Affiliate Disclosure: When you click on links in this section and make a purchase, this may result in this site earning a commission at no extra cost to you.
There are several other tools that you need when using GCC with Makefile to write an application for nRF52. In this section, we will look at those tools and understand why you need them. Let’s take a look at the below diagram for overall picture of what are required components:
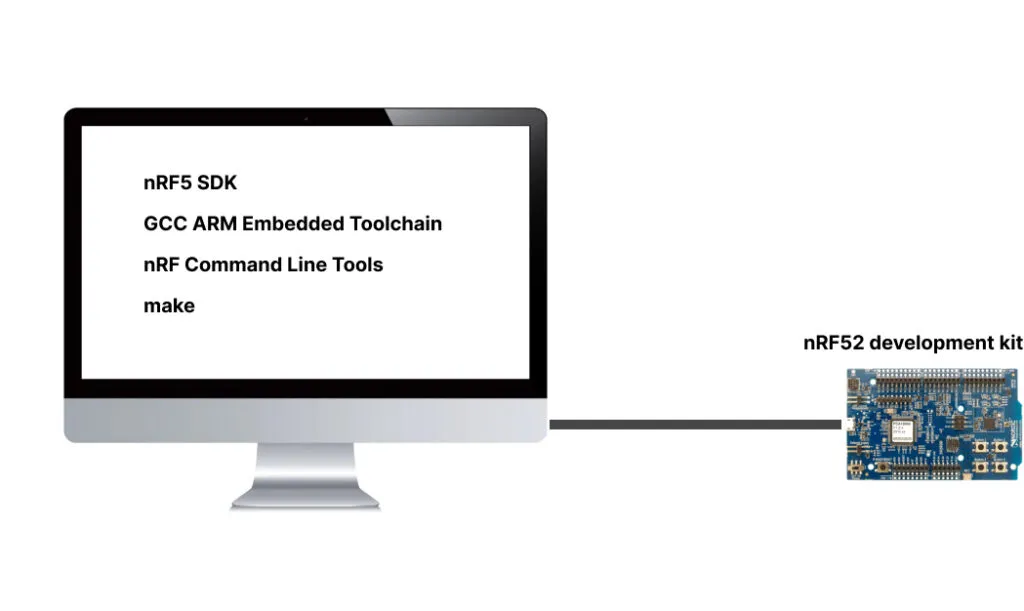 Overview of required components
Foremost, you’ll need nRF5 Software Development Kit (nRF5 SDK) which is the official development framework provided by Nordic. It contains softdevice hex files which are proprietary precompiled bluetooth libraries to write bluetooth low energy applications. It also contains many drivers for control different peripherals inside the nRF52 chip. Other than that, it has a collection of examples which are very useful and can be used as a starting point for developing your projects. You can download Nordic nRF5 SDK from Nordic official website. At the time of writing, latest version is 17.1.0 which we will use in this article.
Secondly, you need GNU ARM Embedded Toolchain which contains a collection of software packages (e.g. compiler, linker, debugger etc) to develop applications for ARM Cortex-M chips on the nRF52. Go to here and download version 9-2020-q2-update. There are newer versions, however, we will use this one because it is the same version used in nRF5 SDK 17.1.0. Choosing a different version might still work most of the time, but there might be subtle differences in these versions which may cause unwanted bugs. Select appropriate file for your target system (Windows, Mac or Linux) and download it to your computer.
Thirdly, you need to download Nordic nRF Command Line Tools from Nordic’s website. It contains a number of tools for interacting with nRF52 chip. The one that we are interested in is nrfjprog which is used to control target nRF52 chip (such as flashing new firmware image or resetting the chip). It also contains JLink driver for controlling JLink debug probes. If you are using a nRF52 development kit, there is an integrated JLink programmer/debugger on board.
Lastly, you need to install make. On MacOS, make is installed when you install XCode Command Line Tools. Each project comes with a Makefile in which there are rules to build the project. make will read Makefile and invoke necessary programs in GNU ARM Embedded Toolchain to build target binary. If make is not available on your system, a quick google search will usually provide you the answer on how to install it.
Those above programs are required and you must install them on your system. As you are writing code, you certainly need a text editor. You can use any text editor you want to write your code, such as Notepad++, Atom, Sublime, etc. There are many options out there, however, I recommend Visual Studio Code, because it is a very powerful text editor with capability to install extension from Marketplace. You can do jump to declaration, find references, and all sort of professional development techniques with VSCode. There is an integrated terminal as well, so essentially you don’t need to leave VSCode during development process. You can also debug code with an extension called Cortex-Debug.
Install tools
In this section, you will install the tools that I mentioned previously on you system. The nRF5 SDK and ARM Toolchain mentioned above are provided in zip packages. Installing these tools means unzipping and placing them at the correct place.
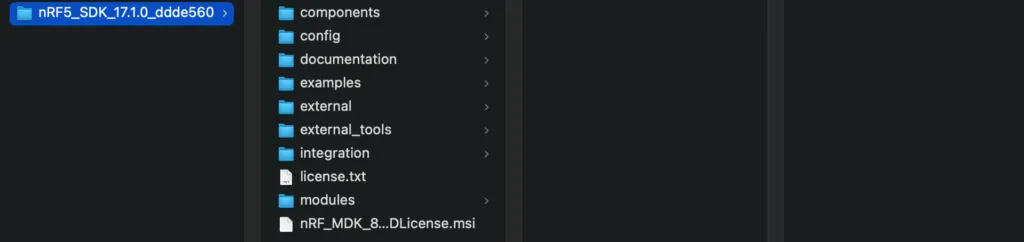
- Extract the nRF5 SDK zip file and save it at
~/nrf52/nRF5_SDK_17.1.0_ddde560. You should see a number of folders inside the extracted folder, like the below figure. There are many files inside these folders, but you don’t need to remember them all. Gradually, as you are more experienced with Nordic development, you’ll become more familiar with those files.
- Extract the ARM GCC Embedded Toolchain that you download in the previous step and save it to
~/nrf52/gcc-arm-none-eabi-9-2020-q2-update. You should see a folder structure like this. In the bin folder, you can find the C and C++ compile, linker, debugger and many other programs. Those programs will be invoked during build process as specified in Makefile.

nRF Command Line tools is provided in standard installation package instead of a zip file. You can install nRF Command Line Tools by clicking the installation image. After installation is successful, check that
nrfjproghas been installed by opening a terminal and typenrfjprog —version
Modify toolchain path
One last step of installation is to modify the toolchain path in the nRF5 SDK. You need to update the path in Makefile.posix or Makefile.windows. If you are using Mac or Linux, change the path in Makefile.posix. If you are using a Windows machine, you’ll need to edit Makefile.windows.

Let’s take Makefile.posix as an example. The GNU_INSTALL_ROOT variable tells where the location of GNU ARM Embedded Toolchain is. What you need to do is to update this path to the correct location that you saved in the previous step. For instance, change this text
GNU_INSTALL_ROOT ?= /usr/local/gcc-arm-none-eabi-9-2020-q2-update/bin/to
GNU_INSTALL_ROOT ?= /Users/epro/nrf52/gcc-arm-none-eabi-9-2020-q2-update/bin/That’s sufficient to complete the installation.
nRF52 GCC project
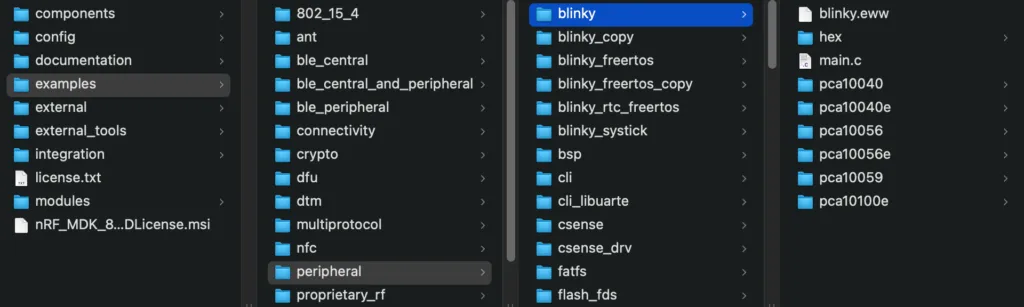
In this section, we will examine how to create a new nRF52 project using GCC, compile and run it. Let’s take a look at an example in nRF5 SDK, the blinky example at the location described in the figure below.
nRF52 GCC Project Structure
The diagram below shows important files in the blinky project
blinky
|---main.c
|---pca10040
    |---blank
        |---armgcc
            |---blinky_gcc_nrf52.ld
            |---Makefile
        |---config
            |---sdk_config.h
There are a number of files that you need to pay attention to
main.ccontainsmain()function and it’s where your application code goes.sdk_config.his the header file which contains peripheral and parameters definitions. Due to the way nRF5 SDK is written, when you use a peripheral, it needs to be enabled insdk_config.h. This configuration file allows you to see all nRF52 resources being used in one place and makes it easier to manage.blinky_gcc_nrf52.ldis the linker script file. This file defines the memory layout of the application and where different parts of your code are mapped in the flash and RAM. For example, this section of the linker script file tells to place the code at address 0 and size of flash is 512 kB. RAM starts at address 0x20000000 and size of RAM is 64 kB. You need to understand nRF52 memory map in order to understand these values. It is recommended that you read memory layout section in the nRF52 datasheet that you are using.

Makefileis where you define how to build the project. Let’s take a quick look at some parts of theMakefile.
![]()
These variables define the PATH of nRF5 SDK root folder and project directory. If you save nRF5 SDK at different location, you will need to modify these variables to point to the correct location.


These lines define the source files and include folders for compilation. From here, you can see all the required source files and folders in your project. If you create a new file, you will need to manually insert them to these lines so that they get compiled when running make. It is not a good idea to add these files and folders from scratch as it is very tedious. You should start from an example project and make modification from there.
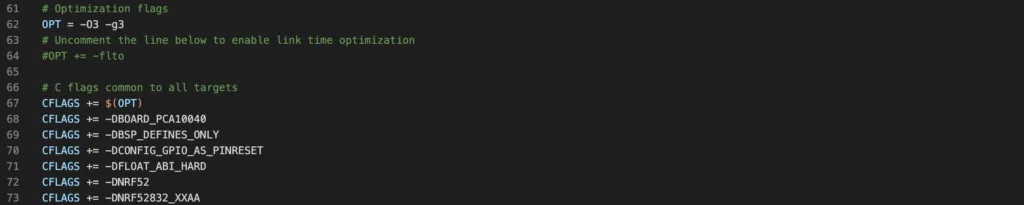
These lines define the flags used when compiling and tell the compiler to use these options when building the binary. For example, you can change the optimisation level by modifying -O flag.
Compile nRF52 GCC project
Now you have an understanding of a nRF52 GCC project structure, let’s compile the project. Open a terminal and go to armgcc folder
cd ~/nrf52/nRF5_SDK_17.1.0_ddde560/examples/peripheral/blinky/pca10040/blank/armgccThen type make and hit Enter. make will read Makefile and invoke different commands to build the project.
makeDuring the build process, you will see log messages printed on terminal, like so

If there is an error during compilation, it will show an error message and details about the error. You will need to fix all the errors in order to complete the build process. If there is no errors, the compiled hex file to load to the target nRF52 is stored at _build/nrf52832_xxaa.hex. By inspecting the output logs, you can also see the size of the binary.
Flash the project
Now you need the nRF5 development kit (PCA10040) to do this step. Plug in the USB cable that connects the development kit and computer and turn on the power switch, then type
make flashThis command will invoke the nrfjprog program that you installed previously and flash the firmware on the chip. After that, it resets the chip, as shown below

Inspecting the log message on terminal will help you understand what’s happening. For instance, you can see that it is flashing the nrf52832_xxaa.hex file in the _build folder. When nrfjprog is invoked to flash the program, it will first erase a page at address 0. This is a page at the bottom of nRF52 internal flash which is 4 kB in size. Since this code is small, it fits within a page. Then nrfjprog resets the chip, load the hex file to the erased flash page and reset the chip again. Once the chip boots up, it runs the new code.

Now you should see 4 LEDs on the board turn on and off sequentially. If so, your program has successfully loaded to the chip.
Conclusion
Phew! That’s quite a bit of stuffs to digest. It took quite sometime for me to understand how things work as well. I think it is well worth the effort to learn how to use GCC with Makefile for nRF52 development.