· Nordic · 7 min read
nRF52 SPI/SPIM peripherals
The Nordic nRF52 series includes both SPI and SPIM peripherals, giving developers flexible options for serial communication. Whether you're dealing with sensors, displays, or memory chips, this guide will help you understand the differences between the standard SPI and the enhanced SPIM (SPI Master with EasyDMA) modules. We’ll walk through how to use the nrf_drv_spi driver from the nRF5 SDK to configure and manage SPI transfers efficiently. With clear examples and practical tips, you'll be ready to implement fast, reliable SPI communication in your next nRF52 project.
Introduction
SPI stands for Serial Peripheral Interface and is a popular communication protocol in embedded systems. SPI involves a master device and a slave device. The master device controls the communication, e.g. it decides when to request data from the slave. The protocol uses 4 wires which are named SCK, MISO, MOSI and CS. Due to its popularity, most microcontrollers, including nRF52, have hardware blocks supporting this protocol so that you don’t need to manually control these signal from your code. nRF52 has two modules implementing SPI communication: the SPI and SPIM peripherals. In this guide, you will learn these modules. Specifically, we will talk about:
- SPI and SPIM peripherals: difference, instances, address space
- The
nrf_drv_spidriver to control the SPI/SPIM modules - A sample project in nRF5 SDK using SPI/SPIM to communicate with an external SPI device
To compile and run your code on real nRF52 hardware, it is recommended that you have a nRF52 development kit such as
Affiliate Disclosure: When you click on links in this section and make a purchase, this may result in this site earning a commission at no extra cost to you.
SPI and SPIM peripherals
Both SPI and SPIM peripherals can be used when the nRF52 chip acts as the Master device. The difference between them is the SPI peripheral does not support EasyDMA, while SPIM peripheral supports direct memory access using EasyDMA. As a reminder, EasyDMA block is a hardware module responsible for reading and writing data directly from RAM. Using EasyDMA means the SPIM module can use regions in RAM as transmit and receive buffers. This will speed up the transmission rate and data can be sent and receive faster with SPIM. Therefore, the SPI peripheral is marked as deprecated and you should use the one with EasyDMA support (SPIM) if it is available in your chip.
In each nRF52, there might be more than one SPI instance and one SPIM instance. Let’s use nRF52832 as an example and take a look at its datasheet. There are 3 SPI instances which are named SPI0, SPI1 and SPI2. There are also 3 SPIM instances (SPIM0, SPIM1, and SPIM2). You can also see that the SPI0 and SPIM0 have the same peripheral ID 3 and base address of 0x40003000. In fact, they share the ID and base address with other peripherals as well (SPIS0, TWIM0, TWI0, TWIS0). Having same ID and base address means they can not be used at the same time as there will be conflict in accessing the same address region.
When working with SPI, you should also be aware of their maximum frequency. A higher frequency means higher throughput rate. You should choose the chip which supports your application’s transfer need. For example, as mentioned above, nRF52832 only have 3 SPI and SPIM instances (0, 1, 2) with maximum frequency of 8 MHz. If you need higher speed, you can opt for nRF52840 which has an additional SPIM instance named SPIM3 with faster speed of up to 32 MHz.
One feature of SPI/SPIM peripherals which I like is flexible I/O selection. Instead of hard-wiring to specific I/O pins as other chip family, SPI pins in nRF52 are programmable. In other word, you can choose any available I/O pins as CS, MOSI, MISO and SCK and they can be configured through software. This is great, as it simplifies routing and placing components when designing a board using nRF52 with SPI.
The nrf_drv_spi driver
To control the SPI/SPIM peripherals, nRF5 SDK provide the library nrf_drv_spi. In this section, we will look at how to include this library, how to enable SPI/SPIM peripheral in your project configuration.
Include the driver
To include the driver in your project, you need to include nrfx_spi.c, nrfx_spim.c and nrf_drv_spi.c in your source file list as follow

nrfx_spi is the driver to control SPI instances, nrfx_spim is the driver to control SPIM instances. The nrf_drv_spi library will call functions from one of these drivers depending on your project configuration. If you choose to use EasyDMA, nrfx_spim is used, otherwise, nrfx_spi is used instead.
Enabling the SPI/SPIM instance
In your project configuration file sdk_config.h, you need to enable the instance that you want to use. For example, if you want to use SPIM0 instance, you need to enable it. Unfortunately, the sdk_config.h contains many SPI, SPIM, NRFX_SPI and NRFX_SPIM definitions which are quite confusing. You will need to pay attention to the file apply_old_config.h in $(SDK_ROOT)/integration/nrfx/legacy to understand how they works. As an example, here are the settings you need to turn on if you want to use SPIM0
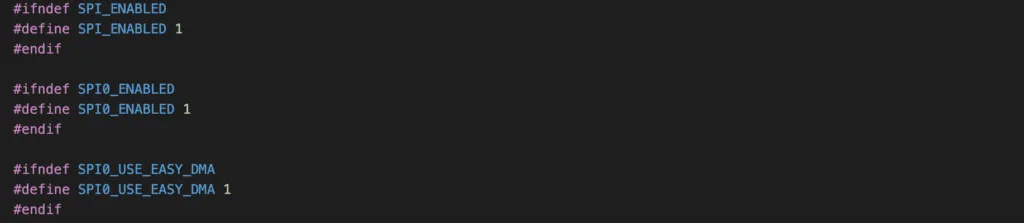
Change the setting SPI0_USE_EASY_DMA to 0 and under the hood, the nrf_drv_spi driver will use SPI0 instance and call functions from nrfx_spi instead.
Now let’s take a look at a few common APIs in the driver.
Initialisation
The driver needs to be initialised before using. Initialisation means telling which SPI/SPIM instances you want to use and what are the parameters (such as speed, mode, pins). The driver provides function nrf_drv_spi_init() to do initial setup which accepts a few arguments:

p_instanceis a pointer that points to the SPI/SPIM0 instance. You can use the macroNRF_DRV_SPI_INSTANCE()to specify which instance you want to use. For example, you can useNRF_DRV_SPI_INSTANCE(0)to indicate that you want to use SPIM0 instance. Remember in the previous section, we have enabled SPIM0 in project configuration by specifyingSPI0_USE_EASY_DMA 1.p_configis a pointer to configuration structurenrf_drv_spi_config_t. It specifies which pins are used as SCK, CS, MISO, MOSI, the frequency, mode, bit-order and interrupt priority.handleris the event handler that is called when data has been sent. IfNULLis passed, then this function is blocking, i.e. waiting for the transfer to finish and return.p_context: context passed to event handler, which you can set NULL.
Transfer data
After setting up, the SPI/SPIM module is ready to send and receive data. To transfer data, you use the API nrf_drv_spi_transfer(). You need to pass the pointer to the instance structure and specify transmit buffer and size, receive buffer and size to this function. In the next section, we will see how this function is used in a project.

nRF52 SPI project example
In this section, we will take a look at the spi example in nRF5 SDK and see how it works. This example is sufficiently simple for beginners to get started with. Open main.c from nRF5_SDK_17.1.0_ddde560/examples/peripheral/spi. and analyse the code to understand normal workflow when working with SPI.
- First, they define a variable
spiby using theNRF_DRV_SPI_INSTANCEmacro. In this example, they are using SPIM0 instance with EasyDMA enabled. As mentioned earlier, you will find EasyDMA is used no where in the main program. It is enabled through project configuration sdk_config.h and used internally inside driver functions.
static const nrf*drv_spi_t spi = NRF_DRV_SPI_INSTANCE(SPI_INSTANCE);- They initialise the SPI driver by using
nrf_drv_spi_init()function and specify an event handlerspi_event_handlerwhich will be called when SPI transfer finishes. Note that here a default configuration NRF_DRV_SPI_DEFAULT_CONFIG is used. These SPI default parameters are defined in sdk_config.h and you can customise these parameters by changing respective definitions.
  nrf_drv_spi_config_t spi_config = NRF_DRV_SPI_DEFAULT_CONFIG;
  //...
APP_ERROR_CHECK(nrf_drv_spi_init(&spi, &spi_config, spi_event_handler, NULL));- In the main loop, they call
nrf_drv_spi_transfer()to send data from transmit buffer and receive data to receive buffer. A flagspi_xfer_doneis set tofalsebefore transfer function. In the event handler, this flag will be set totrue. Then it just wait in sleep mode until the transfer is done. The nrf_drv_spi_transfer() function will take data from the transmit buffer m_tx_buf and send it over to SPI slave. Data from SPI Slave is also written to a receive buffer m_rx_buf.
  spi_xfer_done = false;
  APP_ERROR_CHECK(nrf_drv_spi_transfer(&spi, m_tx_buf, m_length, m_rx_buf, m_length));
  while (!spi_xfer_done)
  {
  __WFE();
}- In the event handler, it toggles the flag
spi_xfer_doneto indicate transfer has been completed.
  void spi*event_handler(nrf_drv_spi_evt_t const * p*event,
  void * p_context)
  {
  spi_xfer_done = true;
  //...
  }
Wrapping Up
This article provides a detail picture of hardware and software components when working with SPI/SPIM peripherals in nRF52. Hopefully it gives you the foundation you need before diving deeper to more advanced applications with SPI/SPIM. Thanks for reading.