· Esp32 · 5 min read
Getting started with micropython on ESP32
MicroPython brings the simplicity and flexibility of Python to the powerful ESP32 microcontroller, making it an excellent choice for rapid prototyping and IoT projects. In this blog post, we guide you through the essentials of getting started with MicroPython on the ESP32. From setting up the necessary tools and flashing the MicroPython firmware to writing and running your first MicroPython program, this tutorial provides a clear, step-by-step approach. Whether you’re a beginner or an experienced developer, this guide will help you unlock the potential of MicroPython on the ESP32 for your next embedded project.
Introduction
In this article, you will learn about micropython and how to write micropython programs for ESP32. We will cover the following topics:
- What is micropython
- How micropython works
- How to write and run your first micropython programs on ESP32
- Tools needed to get started with micropython on ESP32
Prerequisites
In order to follow along with this tutorial, you will need an ESP32 development Kit. We will be using ESP32-DevKitC as listed in the table below
| QTY | Component Name | Buy on amazon |
|---|---|---|
| 1 | ESP32 DevKit C | amazon.com |
Affiliate Disclosure: When you click on links in this section and make a purchase, this may result in this site earning a commission at no extra cost to you.
What is micropython
Micropython is a project aiming at running python 3 code on certain families of microcontrollers with limited resources. If you know already know how to write python code, then micropython makes it possible to run python programs on those microcontrollers. To understand how everything works, let’s take a look at the following diagram:
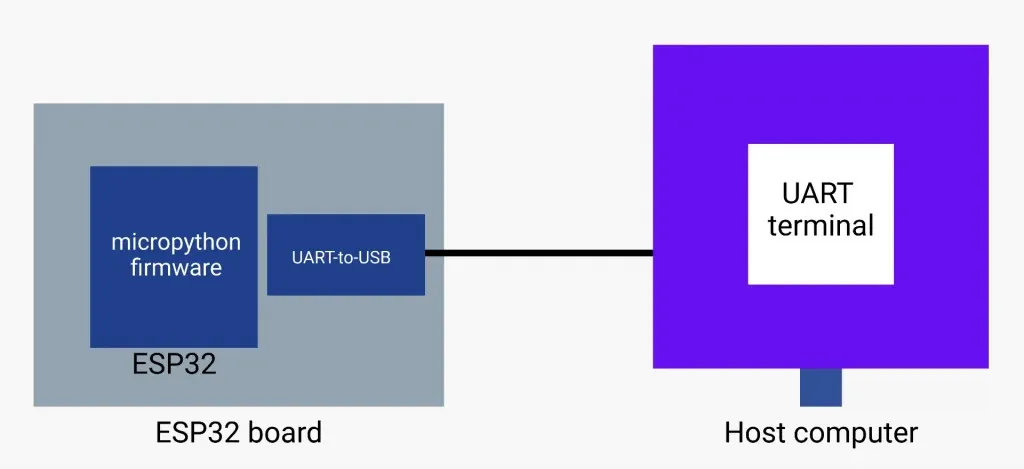
As can be seen from the diagram, there are several components when working with micropython:
- ESP32 board: this is a PCB board containing ESP32 chip and an UART-to-USB interface so that host computer can communicate with the target ESP32. In this article, we are using ESP32 DevKit C.
- micropython firmware: to run micropython code, you need to flash a special firmware onto the ESP32 target chip. This firmware is developed using Espressif ESP-IDF framework and is written in C. Its roles are:
- Booting up the ESP32 chip then create an application that manages ESP32’s UART interface
- Provide an interactive python prompt called REPL (Read Evaluate Print Loop) over UART (or WiFi, which we will covered in another article).
- To see the prompt, you need to use an UART terminal on host computer and connect to the ESP32 board via USB.
- Once connected, you can write python code on the UART terminal and press Enter. Your code will be sent to ESP32 via UART.
- Upon receiving this code, the firmware will interpret your code and execute code line-by-line. Output will be sent back to the terminal via UART.
- To be able to do so, the firmware needs to implement a python interpreter which understands python code syntax, translate it to machine code, then execute it.
- In order to interact with underlying ESP32 peripherals such as GPIO or SPI/I2C, etc, the firmware also needs to provide a certain set of libraries to convert from python code to ESP-IDF APIs, since micropython is built on top of ESP-IDF.
- Host computer: this is where you write your python code and transfer it to the target ESP32 chip via UART for execution. You will need:
- A text editor: to write your python code. Any text editor will be fine. We recommend to use Visual Studio Code with python extension.
- A terminal program: If you are using Mac, you can use
screen, or CoolTerm. If you are using Windows, you can use putty. pyboard.py: this is a python script that allows you to send a file to ESP32 instead of typing each line of code in a terminal. You will learn how to use it in the next step.
Setting up micropython for ESP32
In this section, we cover step-by-step guide so that you have everything you need to write and deploy for first ESP32 micropython program.
Download micropython
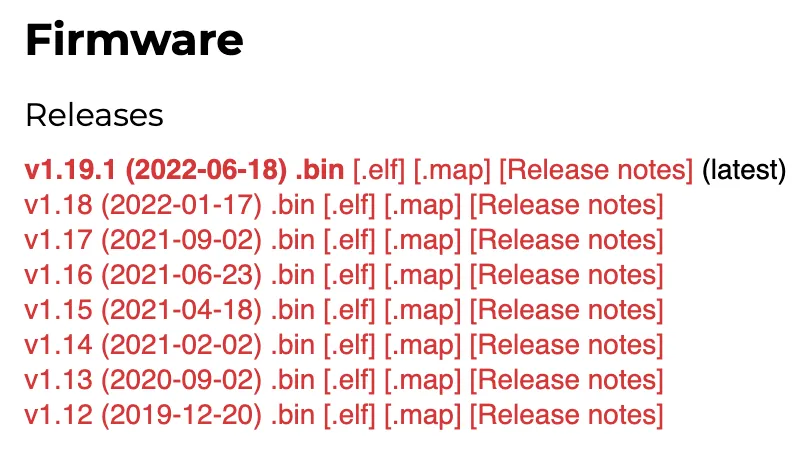
As mentioned earlier, you need micropython firmware flashed onto the ESP32 board before you can write your micropython code. Go to official micropython page for ESP32 here, then select releases Firmware and download latest version. At the time of writing, latest version is 1.19.1.
Install esptool.py
Now you need to flash downloaded firmware to the target ESP32 chip. Espressif provides a tool called esptool.py for this purpose. On Mac, you can install esptool.py by typing
python3 -m pip install --upgrade pip
python3 -m pip install esptool
These commands will install esptool by using pip. After installation is done, you may need to update your PATH variable.
Flashing micropython firmware
To flash micropython firmware, run these commands from terminal:
esptool.py --chip esp32 --port [PORT] erase_flash
esptool.py --chip esp32 --port [PORT] --baud 460800 write_flash -z 0x1000 ~/esp32-20220618-v1.19.1.bin
where [PORT] is the serial port that your ESP32 is connecting to.
Access interactive prompt
After flashing your firmware, you are ready to experiment writing your first micropython code with ESP32. Open an UART terminal program. If you are using a Mac, you can use screen and type the following to the terminal
screen [PORT] 115200where [PORT] is the serial port that your ESP32 is connecting to and 115200 is the baud rate of the UART. If everything is working properly, you should see the following screen
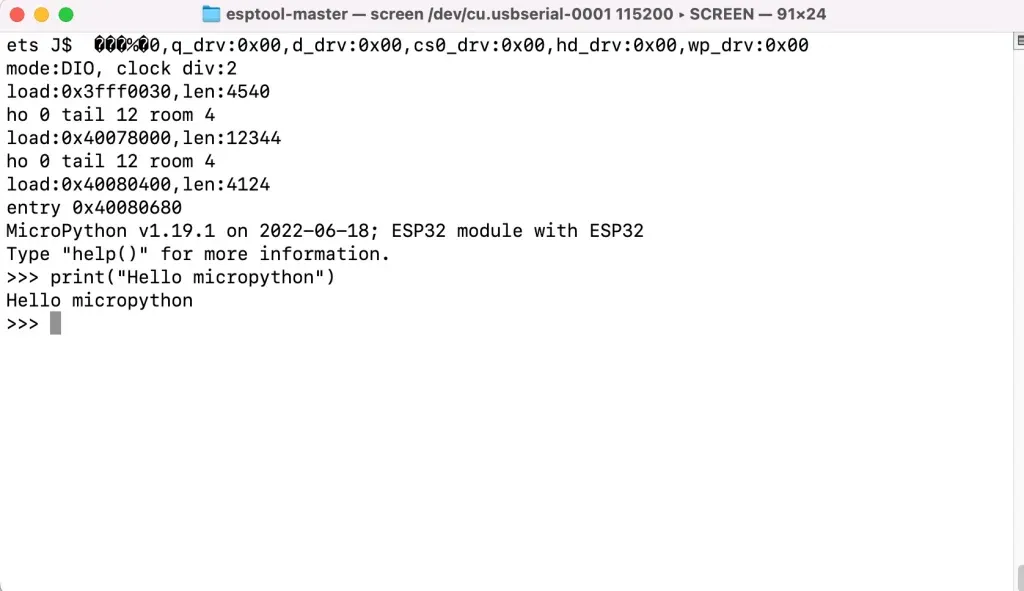
Now you can write your python program to the terminal. They will be sent to ESP32 for interpreting and executing, then result is sent back to the terminal. For example
>>>print("Hello micropython")
Hello micropython
>>>
Running a script on ESP32 using pyboard.py
What to do if you want to run a script on ESP32 instead of typing each line of code in the interactive prompt? You can you pyboard.py, which is a python script to load a micropython file on the target ESP32 and execute it. Go to here to download the script. Place it in your home folder. Create a script test.py and write your code in there. To load test.py to ESP32 and execute it, run the following command
python3 pyboard.py -d [PORT] test.pyIf you see an error like
b'5\nload:0x40078000,len:12344\r\nho 0 tail 12 room 4\r\nload:0x40080400,len:4124\r\nentry 0x40080680\r\nMicroPython v1.19.1 on 2022-06-18; ESP32 module with ESP32\r\nType "help()" for more information.\r\n>>> '
could not enter raw repl
Then you need to make a minor modification to the pyboard.py script as suggested here. Basically, add time.sleep(2) to the function enter_raw_repl() like this
def enter_raw_repl(self, soft_reset=True):
        self.serial.write(b"\r\x03\x03")  # ctrl-C twice: interrupt any running program

        # flush input (without relying on serial.flushInput())
        n = self.serial.inWaiting()
        while n > 0:
            self.serial.read(n)
            n = self.serial.inWaiting()

        time.sleep(2)
Wrapping Up
In this article, you have learnt first steps to get your micropython programs up and running on ESP32 board. Thanks for reading.