· Arduino · 6 min read
Creating and Managing Custom Board Definitions in PlatformIO
PlatformIO supports hundreds of official development boards out of the box, but what if you're working with a lesser-known Arduino clone or a custom-designed board? In this post, we’ll walk through how to create and manage custom board definitions in PlatformIO using VS Code. You’ll learn how to define board-specific settings like MCU type, upload speed, and memory layout so you can fully integrate unsupported boards into your PlatformIO workflow. Whether you’re building with a cheap ATmega328P-based board from AliExpress or your own PCB design, this guide will help you make it behave like a first-class citizen in PlatformIO.
One of PlatformIO’s greatest strengths is its expansive support for embedded development boards across a wide range of platforms—from STM32 to ESP32, from Arduino Uno to more exotic chips. But what happens when you’re working with an obscure, clone, or off-brand development board that isn’t officially listed in the PlatformIO registry?
This is a common situation, especially for makers using clone Arduino boards from online marketplaces or custom-designed PCBs based on popular microcontrollers. Fortunately, PlatformIO gives you the flexibility to define your own custom board configuration, making it possible to compile, upload, and debug firmware on virtually any microcontroller that has a toolchain and framework support.
In this guide, you’ll learn how to create, configure, and manage custom board definitions in PlatformIO. Whether you’re working with a knockoff Nano with a CH340 USB chip or a homemade board built around an ATmega328P, this post will show you how to integrate it cleanly into your PlatformIO workflow.
Why Use a Custom Board Definition?
There are several reasons you might need to define a custom board in PlatformIO:
- You’re using a clone board with a different USB-to-serial chip or clock configuration.
- You’re developing on a custom PCB with a microcontroller that’s supported by PlatformIO, but your specific hardware isn’t listed.
- You want to override certain default configurations such as upload speed, clock frequency, or flash size.
- You need a reproducible project setup across machines without relying on board IDs from the PlatformIO registry.
Instead of trying to adapt your project to a loosely related official board definition, it’s often cleaner and more maintainable to define your own.
Understanding How PlatformIO Identifies Boards
Every board in PlatformIO is identified by a JSON file that describes its configuration. This includes:
- MCU type and frequency
- Upload settings (e.g., protocol, speed, bootloader)
- Debugging capabilities
- Frameworks it supports (e.g., Arduino, mbed)
- Default build flags
PlatformIO automatically reads these files from its global board registry. When using an official board, all these settings are already managed for you. But with custom boards, you need to provide this data yourself.
PlatformIO looks for board definitions in two places:
PlatformIO Registry This is where all the standard boards live (e.g.,
uno,esp32dev,nucleo_f401re, etc.).Local Custom Board Definitions These can be defined inside your own project folder, under:
<project_root>/boards/
When PlatformIO sees a .json file in your project’s boards/ directory, it treats it as a board definition—just like the ones from the official registry.
Creating a Custom Board File
You can define custom boards locally within your PlatformIO project by placing a JSON file inside a special boards/ directory. Here’s how to do that using VS Code.
Create the boards/ folder
Open your PlatformIO project in VS Code. In the Explorer pane, right-click the root folder and select New Folder. Name it:
boardsInside this folder, you’ll place your custom board JSON file. For this example, we’ll create a custom configuration for an Arduino Nano clone with a CH340 USB-serial chip and 16MHz ATmega328P.
Add the custom board JSON
Right-click the boards/ folder and select New File. Name it something like:
nano_clone.jsonThen paste in the following configuration:
{
  "build": {
    "core": "arduino",
    "extra_flags": "-DARDUINO_AVR_NANO",
    "f_cpu": "16000000L",
    "mcu": "atmega328p",
    "variant": "eightanaloginputs"
  },
  "frameworks": ["arduino"],
  "name": "Arduino Nano Clone (CH340)",
  "upload": {
    "maximum_ram_size": 2048,
    "maximum_size": 30720,
    "protocol": "arduino",
    "require_upload_port": true,
    "speed": 57600
  },
  "vendor": "Generic"
}
It should look like this
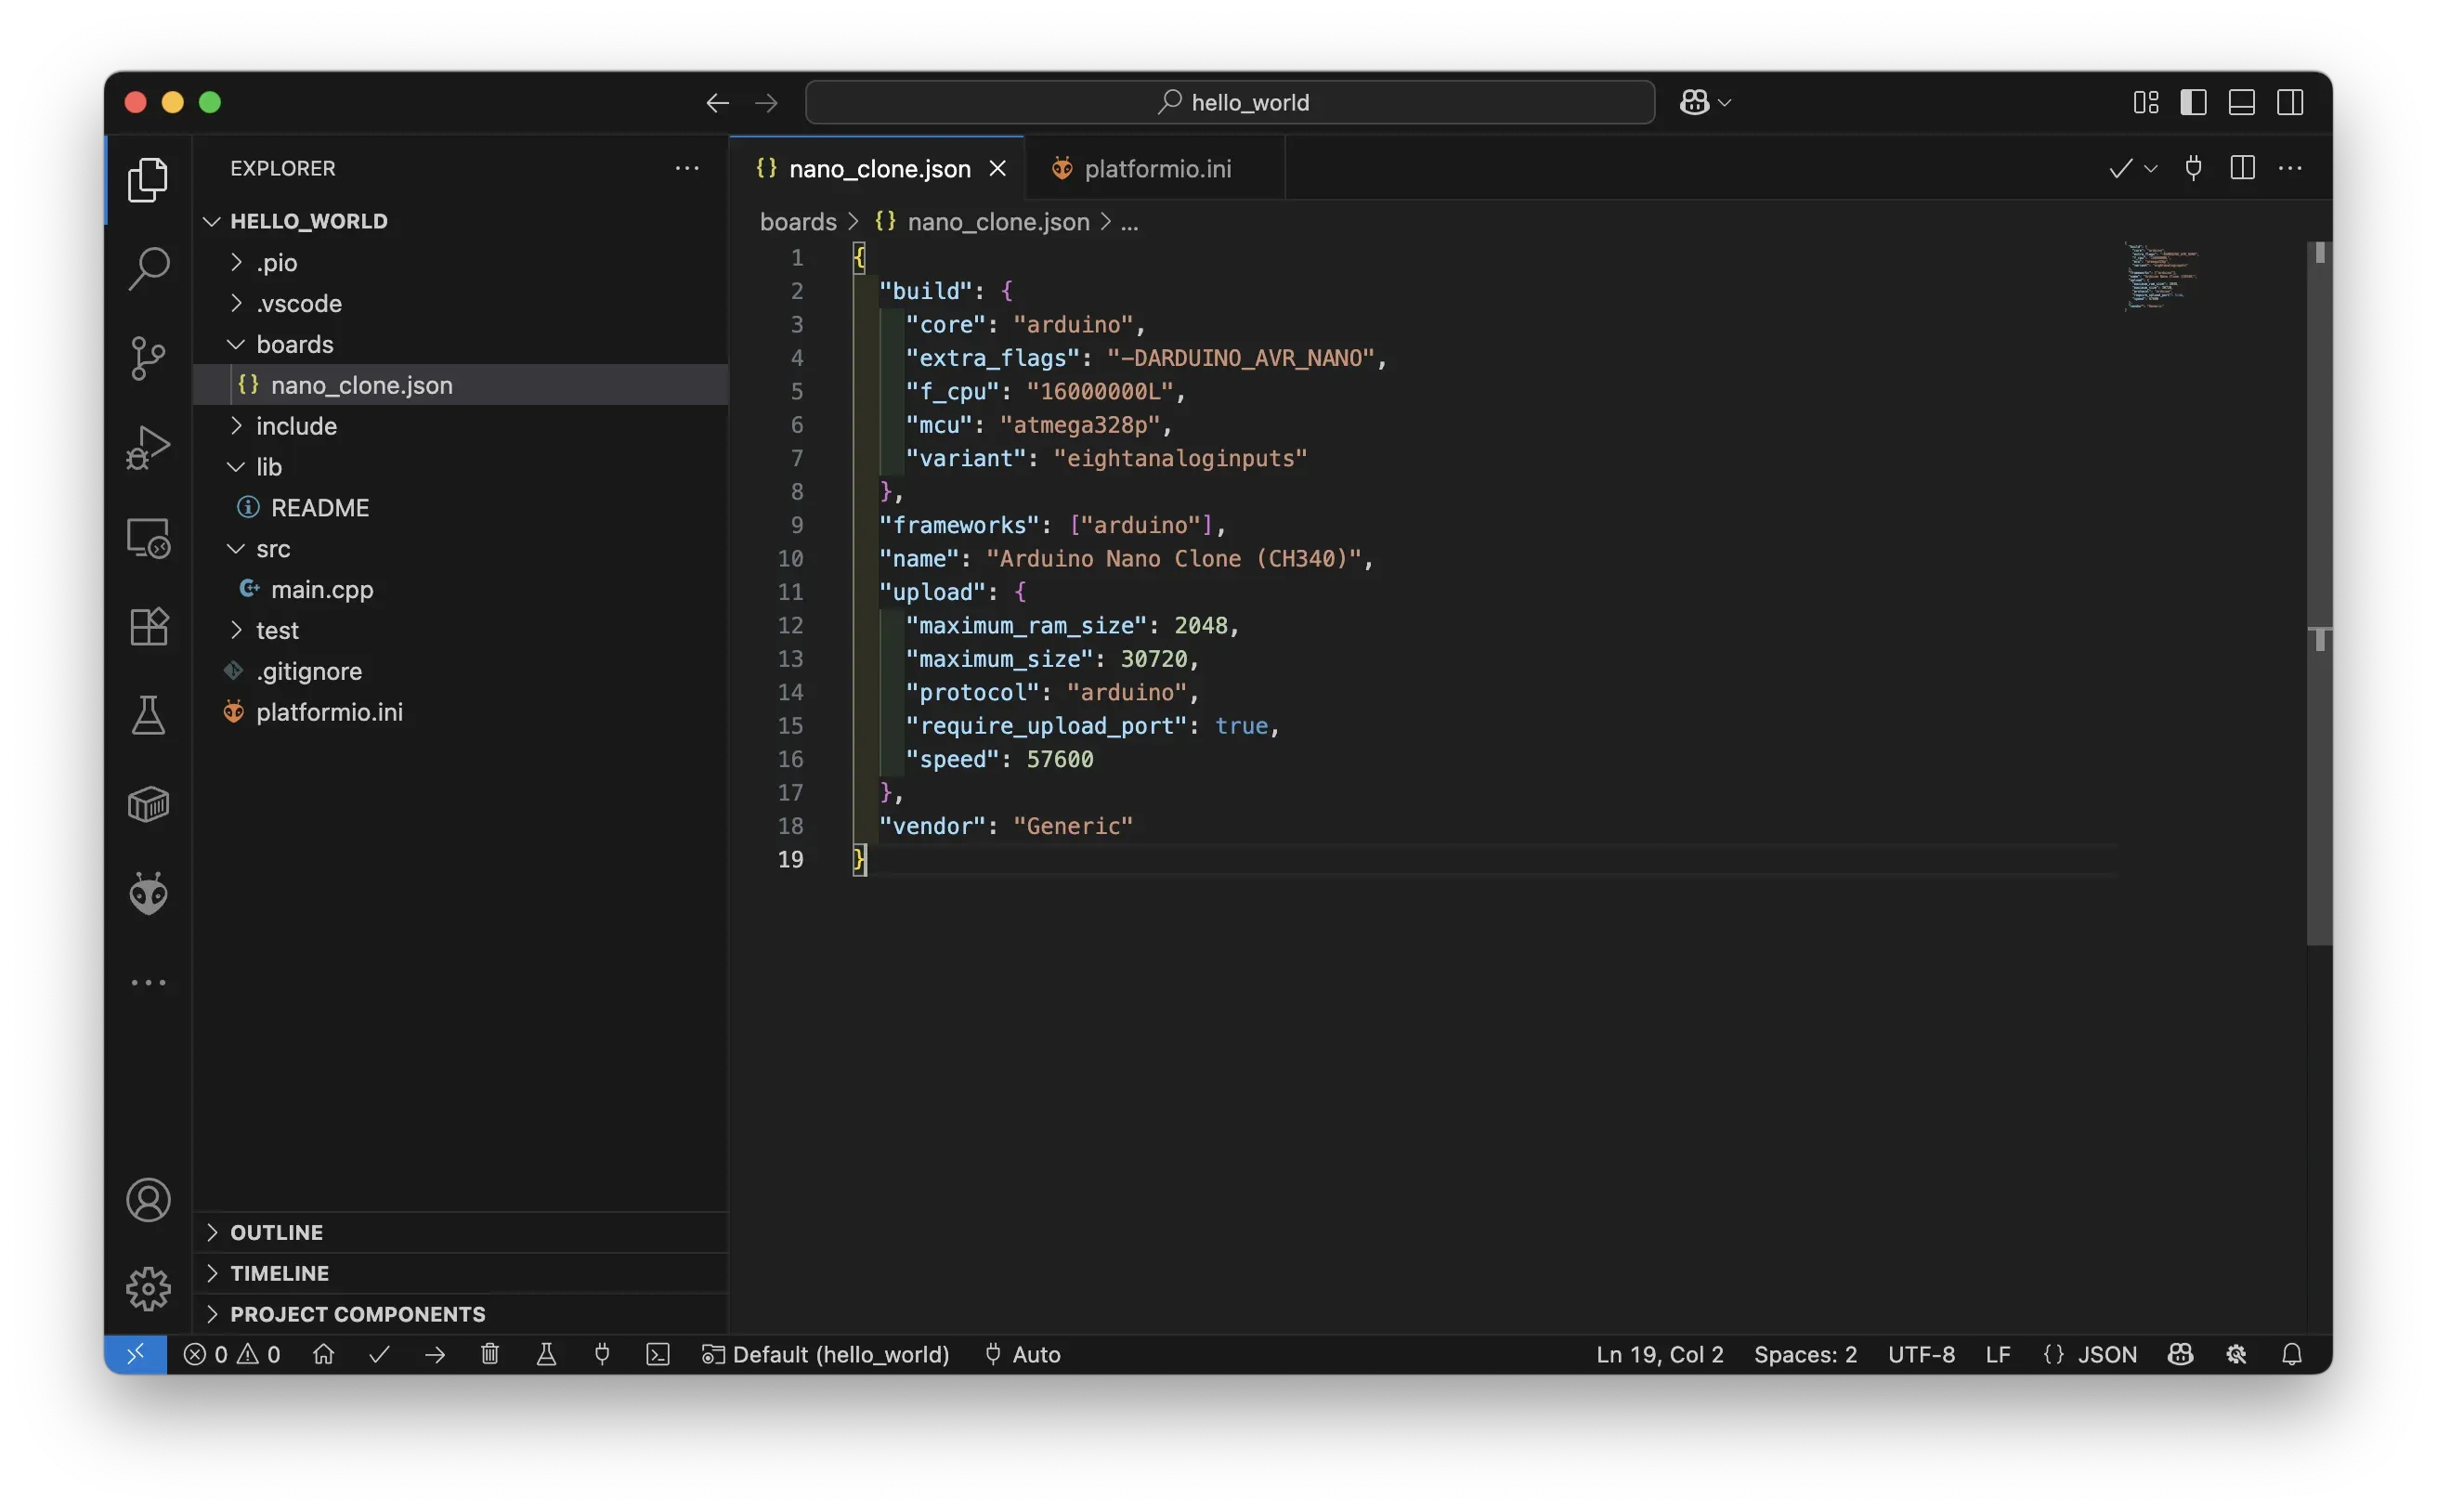
Let’s break down some of the key fields:
"mcu": "atmega328p"– The microcontroller used on your board."f_cpu": "16000000L"– Operating frequency (16MHz for most Arduino boards)."variant": "eightanaloginputs"– Matches the Nano pin mapping."upload.protocol": "arduino"– Works with bootloader-based serial uploads."upload.speed": 57600– Some clones use 57600 instead of 115200.
You can tweak any of these fields depending on your specific board.
Updating platformio.ini to Use the Custom Board
Once your JSON file is ready, you need to tell PlatformIO to use it.
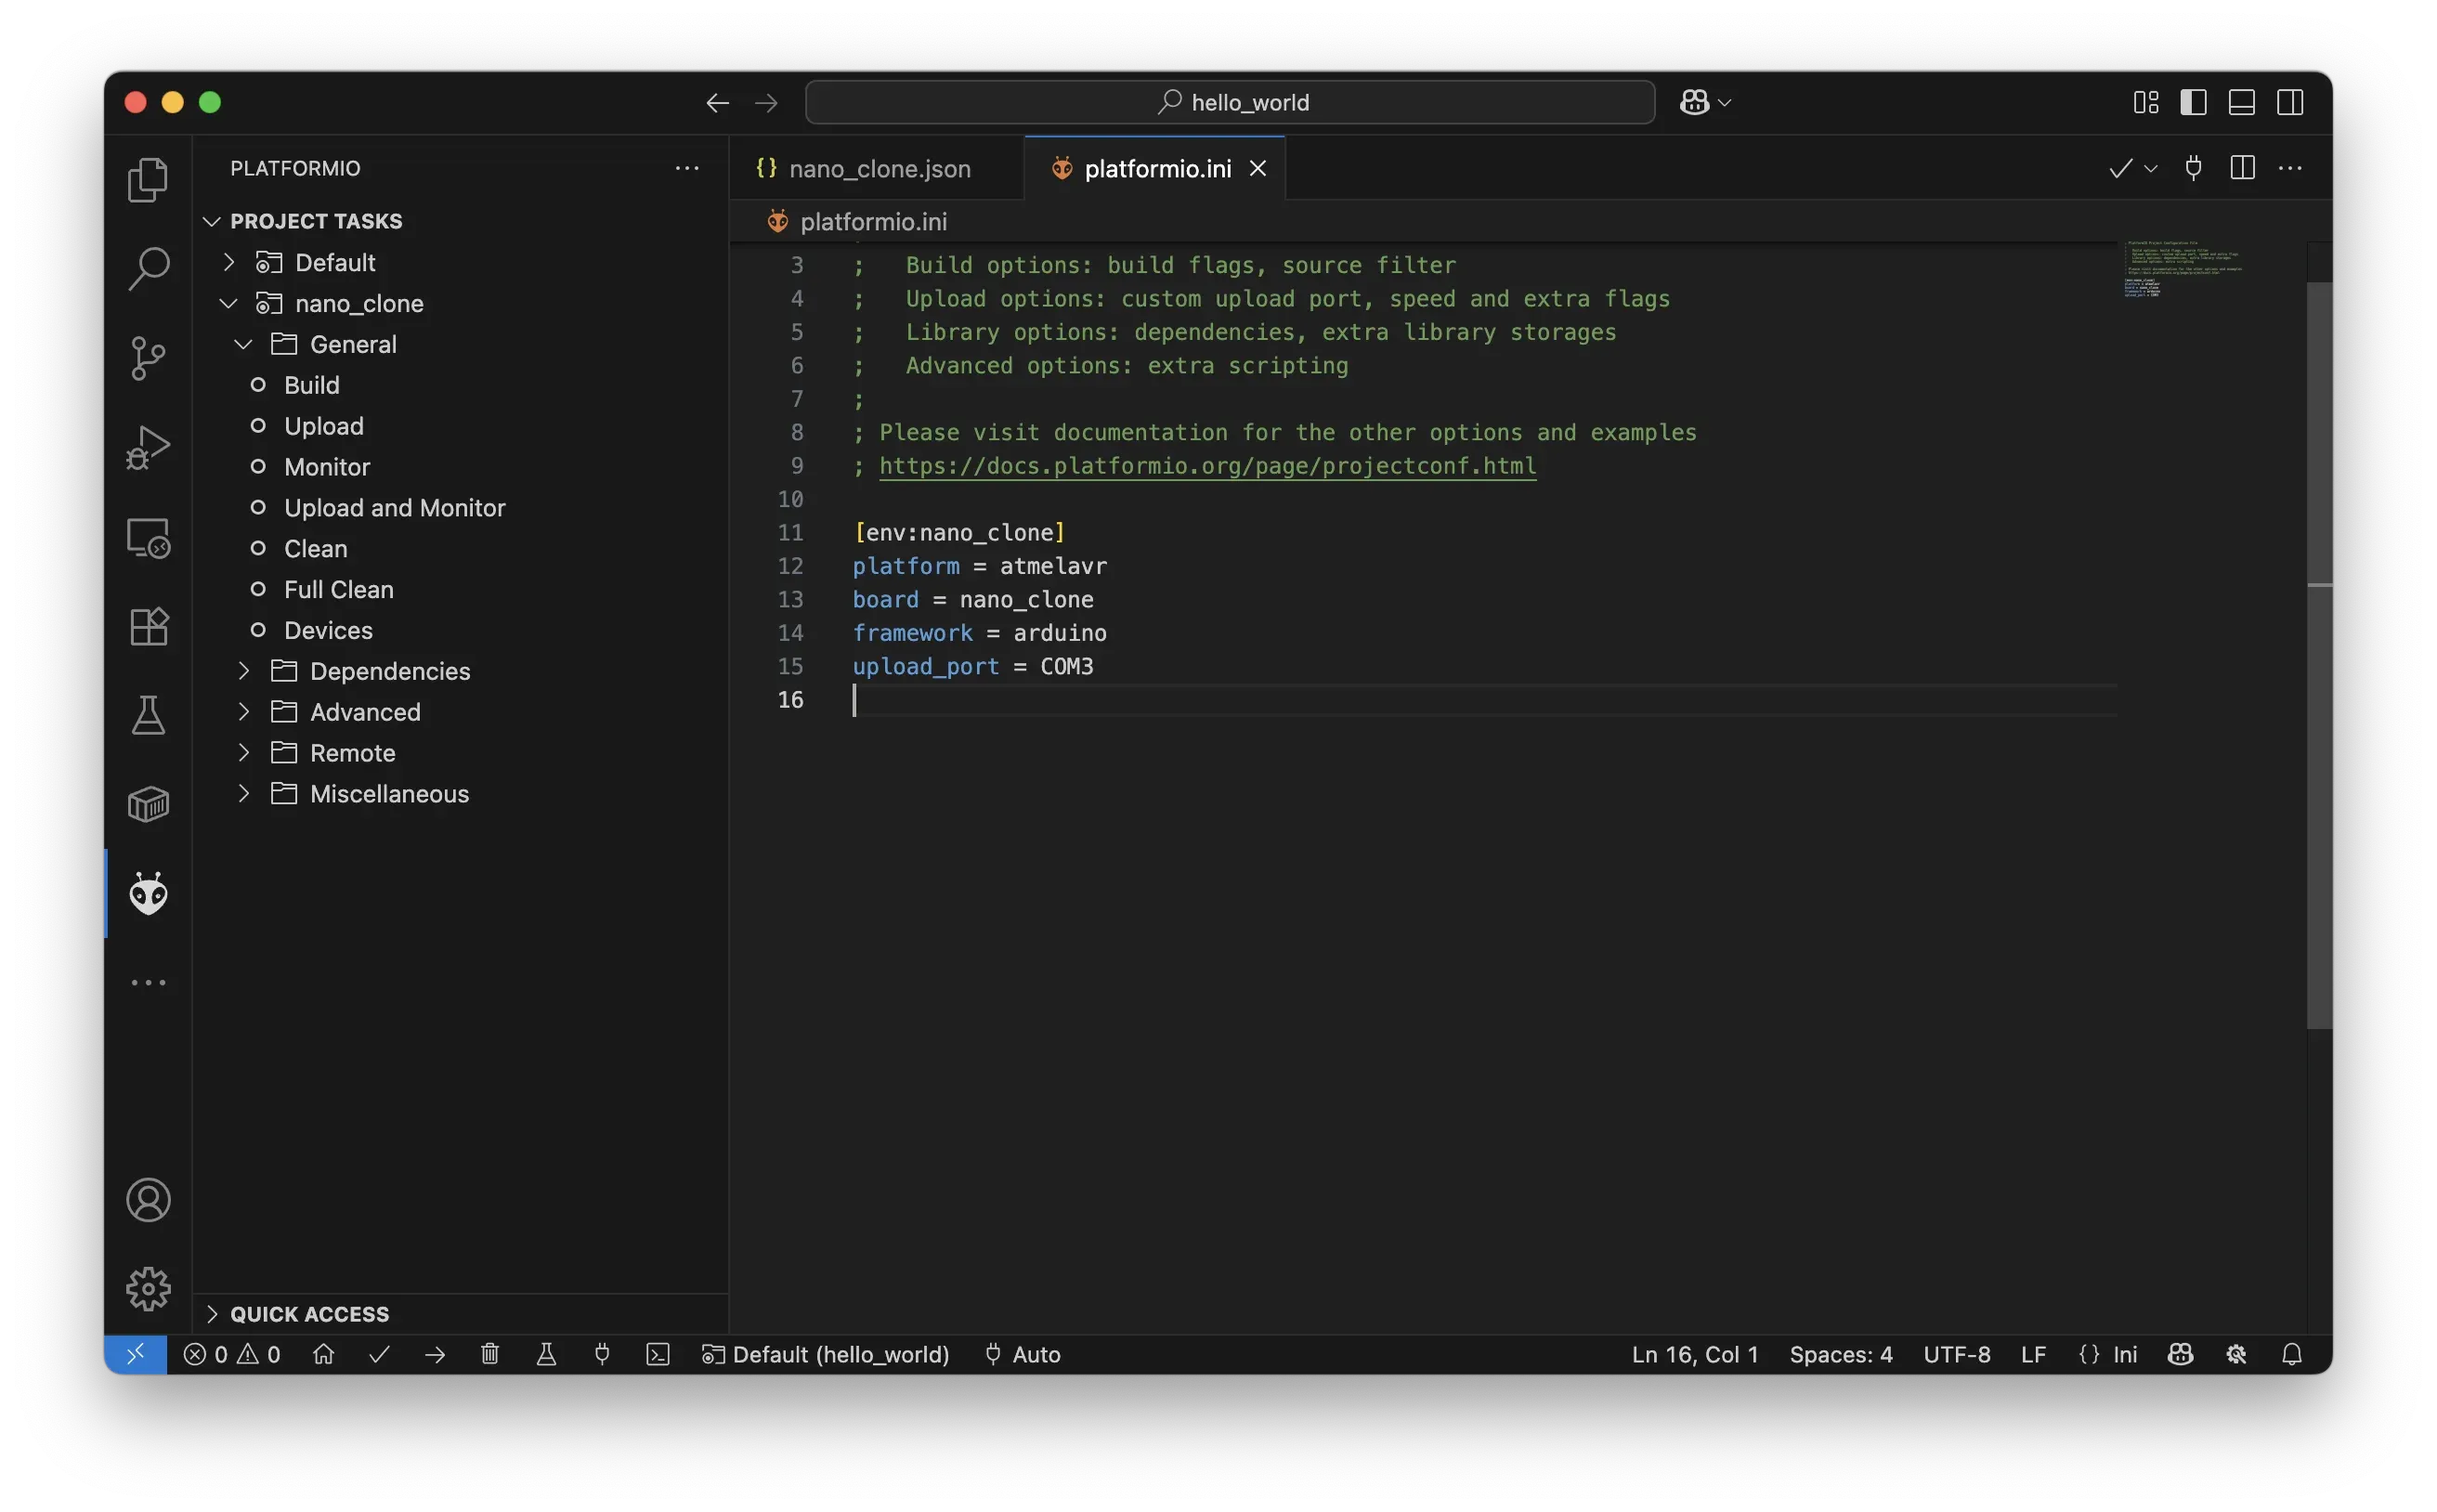
Open platformio.ini from the root of your project in VS Code, and add or modify the [env:...] section like so:
[env:nano_clone]
platform = atmelavr
board = nano_clone
framework = arduino
upload_port = COM3
Replace COM3 with the correct port for your system (you can check the PlatformIO Devices sidebar in VS Code to see which port your board is using).
The board = nano_clone line tells PlatformIO to use the custom JSON definition you just created.
Building and Uploading the Code
Now that everything is configured, you can build and upload code the same way you would with a regular board.
If everything is set up correctly, PlatformIO will compile your sketch and flash it to your custom board. If you see any errors related to upload speed or sync, try adjusting the upload.speed field in the JSON file (e.g., switching between 57600 and 115200).
Finding Board Parameters for Custom Configs
To create accurate board files, you may need to gather technical details about your hardware. Here’s where to look:
- MCU and clock frequency: Usually printed on the chip (e.g., ATmega328P, 16MHz).
- Upload method: Check if the board has a bootloader (like Optiboot) or needs an external programmer.
- Upload speed: Refer to the bootloader spec or try matching the Arduino IDE’s working settings.
- Pinout variant: For Arduino-compatible boards,
standard,eightanaloginputs, ornanoare common variants. - Flash and RAM sizes: Often found in datasheets for your MCU.
If you’ve used the board successfully in the Arduino IDE, you can often find all the needed values in the boards.txt and platform.txt files from your Arduino installation.
Reusing and Sharing Custom Boards
Once you’ve defined a custom board, you can:
- Reuse the JSON file in multiple projects by copying the
boards/folder. - Host it in a GitHub repository and share with teammates or the community.
- Contribute it to PlatformIO if it meets their standards for public inclusion.
For consistency, name your custom board files clearly (e.g., nano_16mhz_ch340.json) and keep documentation in a README.md if needed.
Managing Multiple Boards in a Project
You can define multiple environments in your platformio.ini file, each targeting a different board.
[env:nano_clone]
platform = atmelavr
board = nano_clone
framework = arduino

[env:uno]
platform = atmelavr
board = uno
framework = arduino
In VS Code, use the project environment switcher in the bottom bar to select which board to build for. This is especially useful when supporting both official and clone hardware in the same codebase.
Troubleshooting Tips
If your custom board doesn’t build or upload:
- Double-check the
mcuname andf_cpuvalue. - Verify that
board = nano_clonematches your JSON filename. - Make sure your
platformio.iniuses the correct platform (e.g.,atmelavrfor Arduino). - Use the “Build” and “Upload” buttons in VS Code instead of relying on automatic port detection.
- Look at the PlatformIO Output pane for detailed error messages.
If your board works in the Arduino IDE but not PlatformIO, compare settings like upload speed, protocol, and fuse bits for mismatches.
Conclusion
Working with clone, obscure, or custom boards is a common part of embedded development—especially in the Arduino world where countless variations of popular microcontrollers exist. PlatformIO’s support for custom board definitions makes it easy to bring these unofficial boards into a reliable and repeatable development environment.
By creating your own boards/yourboard.json file, you gain full control over how your firmware is compiled and uploaded. You can tune clock speeds, protocols, memory limits, and bootloader settings to match your exact hardware configuration.
This approach not only ensures compatibility with your specific board but also improves portability and project reproducibility. As your projects grow in complexity—or as you start designing your own hardware—learning how to define and manage custom boards in PlatformIO will become an essential skill in your embedded development toolbox.
- embedded-systems
- arduino
- platformio
- embedded-development
- vscode
- platformioini
- custom-boards
- board-definition
- atmega328p
- clone-boards
- arduino-clone
- board-configuration
- microcontroller-projects